Category: AI

  • Demystifying LLMs: A Software Engineer’s Guide to How Language Models Actually Work

    Demystifying LLMs: A Software Engineer’s Guide to How Language Models Actually Work

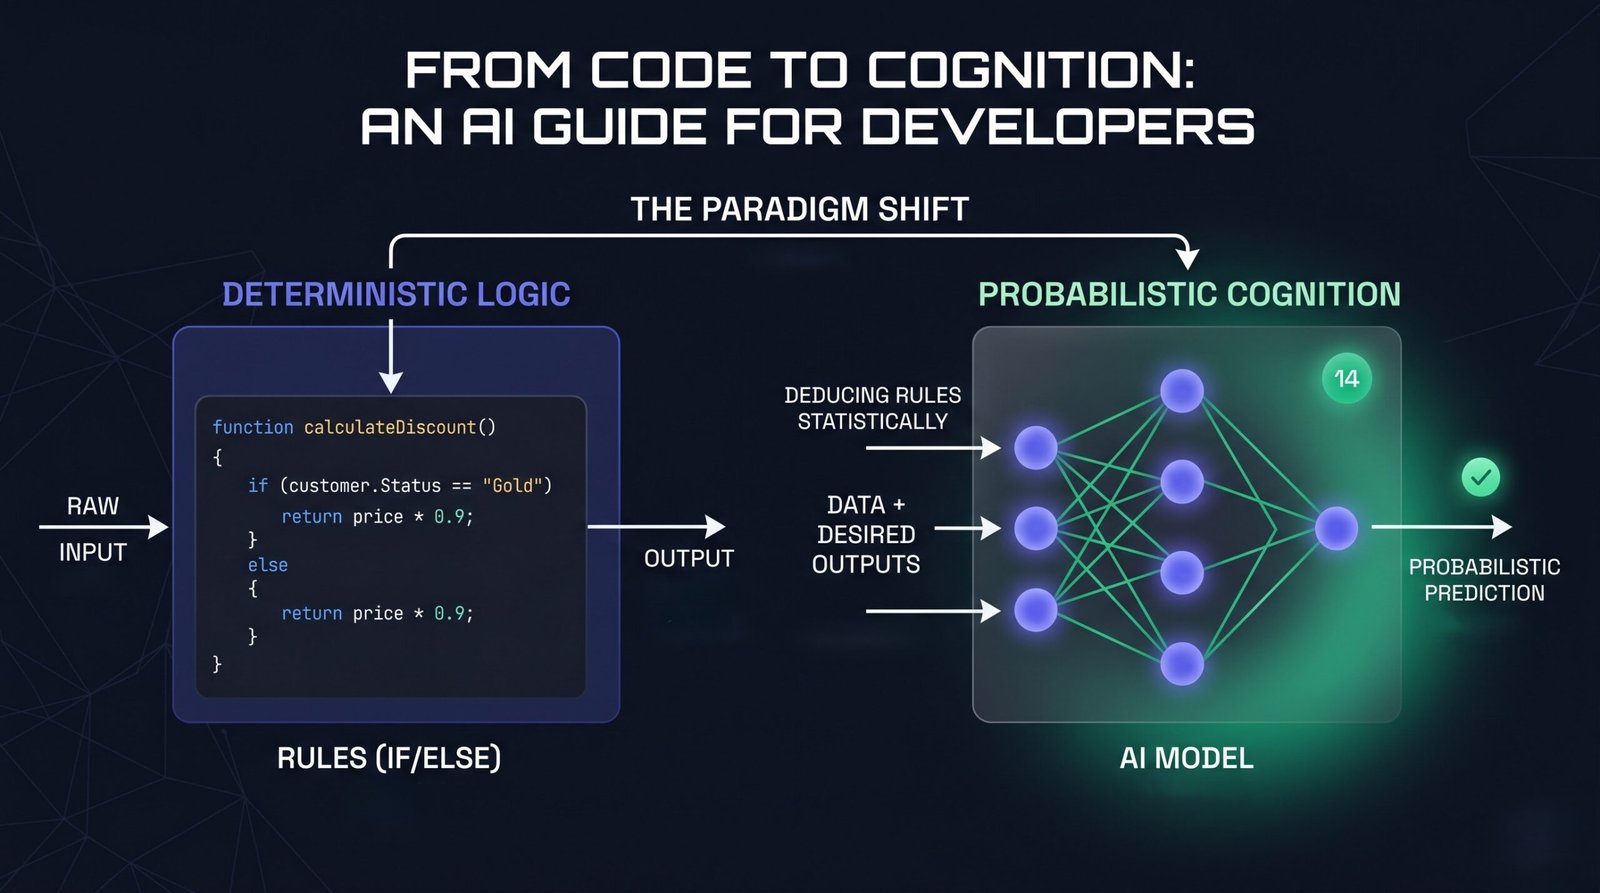
    As software engineers, we are accustomed to building systems based on determinism—where an input X always produces a predictable output Z. When we start working with Large Language Models (LLMs), however, many of us fall into the trap of treating them either like a traditional, deterministic database or a truly autonomous mind. Both assumptions are wrong.

    To build reliable, production-grade AI features, we must adopt the correct mental model: An LLM is a stateless, highly sophisticated probabilistic text-completion engine.

    By understanding how these models handle text, manage memory constraints, and select words, we can move from trial-and-error “prompt engineering” to repeatable, predictable system design.

    The Core Mental Model: Text Completion and Statelessness

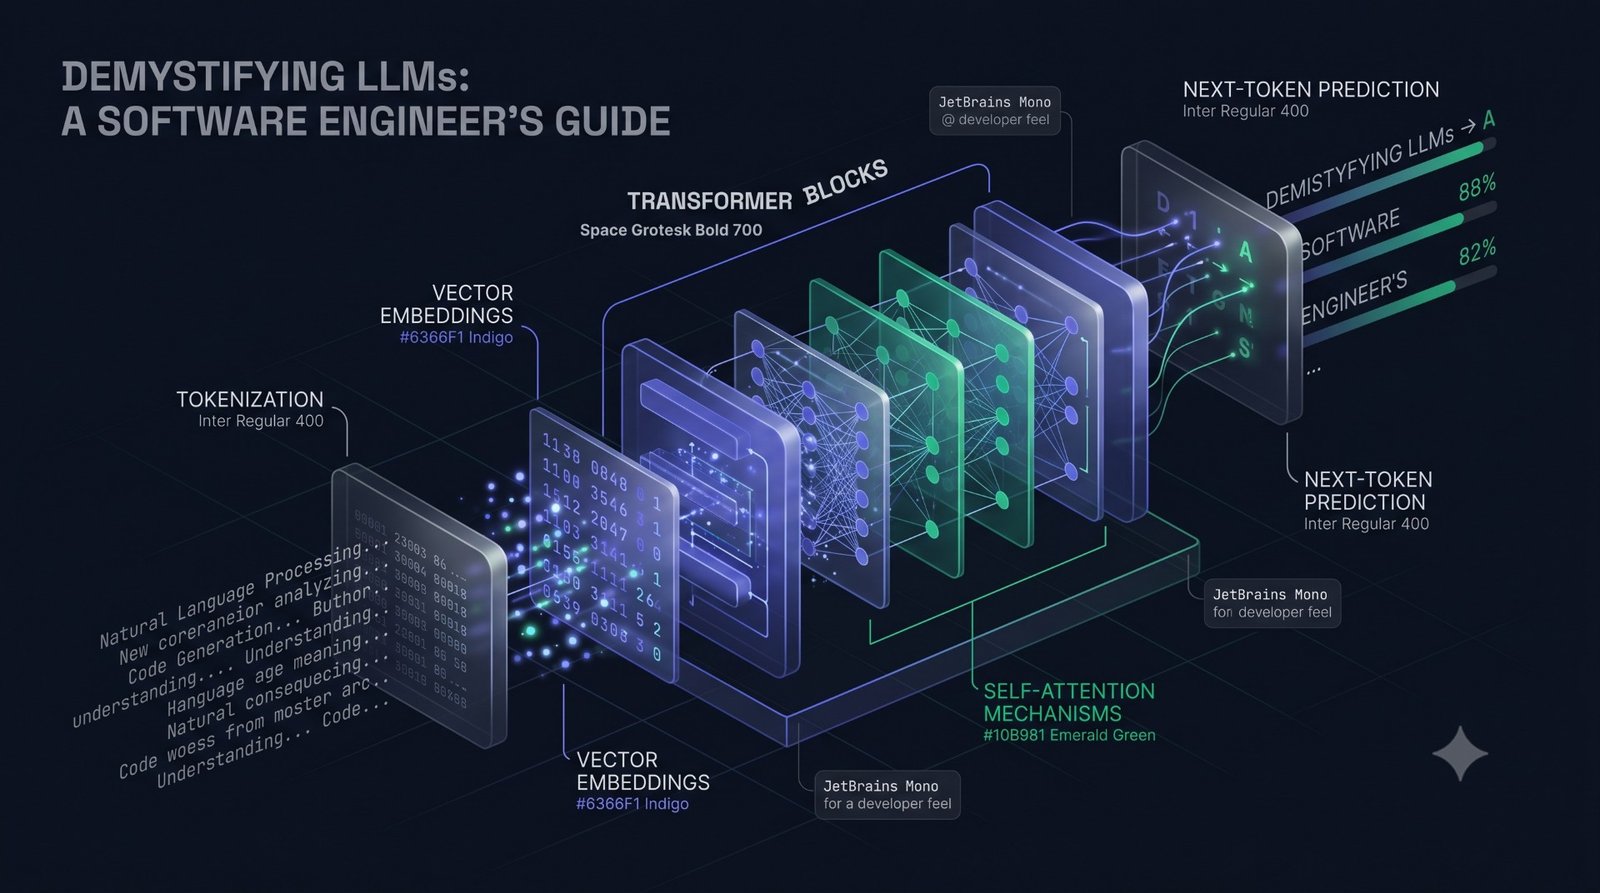
    To effectively integrate LLMs into software architecture, we must first strip away the high-level abstractions of “chatbots” and “assistants.” At their functional core, these models operate on two fundamental principles: autoregressive generation and API statelessness. Mastering these concepts is essential for transitioning from naive implementation to robust, production-ready engineering.

    The Core Token Loop

    When you strip away the conversational interfaces, an LLM is reduced to a single operation: autoregressive text completion.

    The model doesn’t “think” or look up facts in a database. It performs a simple, continuous loop:

    1. It takes your input text (the prompt).
    2. It uses its neural network to calculate a probability score for every potential next word or word fragment (token) in its vocabulary.
    3. It selects the most statistically likely next token.
    4. It appends that new token to the prompt.
    5. It feeds the entire, newly expanded text back into itself to predict the subsequent token.

    Performance Tip: The “Memory Shortcut” (KV Caching)

    You might notice that the process described above implies we re-process the entire prompt for every single new token, which sounds computationally expensive. In practice, modern LLM systems use a technique called KV Caching. Instead of re-calculating everything from scratch, the system “caches” or saves the intermediate states of previous tokens. This allows the model to efficiently build on what it has already generated without needing to re-process the entire history from scratch, significantly speeding up the generation process.

    This sequential, token-by-token prediction continues until the model hits a predefined output limit or generates a special End-of-Sequence (EOS) token. Every piece of content—from a single paragraph to a structured JSON object—is built through this continuous statistical inference process.

    Token: The fundamental unit of text an LLM processes. A token is rarely a single character or a complete word; it is usually a sub-word unit or common punctuation. (In English, roughly 4 characters or 0.75 words equals 1 token.)

    The Statelessness Trap

    A common source of architectural bugs is assuming the LLM API remembers context between requests.

    LLM APIs are fundamentally stateless. Every API call is completely isolated. The model does not retain memory of the log file you sent five seconds ago or the question you asked before that.

    To create the illusion of a continuous conversation (or state), your application layer must take on the full responsibility for memory management.

    You must explicitly compile the entire conversation history—including the system instructions, all user prompts, and all prior model responses—into a single, structured payload and send it back to the model with every API invocation. As the conversation grows, this historical payload consumes more memory and computational resources, driving up both latency and cost.

    Managing Conversational State in Code

    The following Python example demonstrates how a simple application class must manually handle the state array (self.history) because the LLM itself remains stateless.

    import os
    
    from typing import List, Dict
    
    from openai import OpenAI
    
    class ConversationalSessionManager:
    
        def __init__(self, system_instruction: str):
    
            # Initializes the stateful memory array on the application side. 
    
            # The LLM API itself remains completely stateless.
    
            self.client = OpenAI(api_key=os.environ.get("OPENAI_API_KEY"))
    
            self.model = "gpt-4o"
    
            self.history: List[Dict[str, str]] = [
    
                {"role": "system", "content": system_instruction}
    
            ]
    
        def send_message(self, user_message: str) -> str:
    
            # 1. Append the current user state to the history array
    
            self.history.append({"role": "user", "content": user_message})
    
            try:
    
                # 2. Execute a completely stateless request containing the entire historical context
    
                response = self.client.chat.completions.create(
    
                    model=self.model,
    
                    messages=self.history,
    
                    temperature=0.0  # Enforce predictable output
    
                )
    
                # 3. Extract the predicted text completion
    
                model_response = response.choices[0].message.content
    
                # 4. Mutate local state to include the model's response for the next loop
    
                self.history.append({"role": "assistant", "content": model_response})
    
                return model_response
    
            except Exception as e:
    
                # Roll back the history to prevent state corruption on failure
    
                self.history.pop()
    
                raise RuntimeError(f"Stateless invocation failed: {str(e)}")
    
    # Example Execution:
    
    if __name__ == "__main__":
    
        system_prompt = "You are an automated log parsing assistant. Respond only with structured analysis."
    
        session = ConversationalSessionManager(system_instruction=system_prompt)
    
        # Request 1: Providing the raw contextual data
    
        res1 = session.send_message("Log entry: 2026-06-02 10:14:22 ERROR: DbConnection timeout.")
    
        # Request 2: Dependency on previous context, which is sent back implicitly by the class. 
    
        res2 = session.send_message("What infrastructure component caused that exception?")

    By manually managing state, you gain explicit control to optimize payload size, trim old context, and predictably control cost.

    Understanding Tokens: The True Currency of LLMs

    To an LLM, your code or natural language text is illegible. The model processes text only after it is translated into a sequence of tokens (integer IDs). Understanding token behavior is essential, as it dictates your API cost, application speed, and structural limits.

    What is a Token?

    Before raw text reaches the neural network, it passes through a deterministic pre-processor called a tokenizer. Modern models use a technique called Byte-Pair Encoding (BPE). BPE works by analyzing massive amounts of training data and grouping the most common pairs of characters or bytes into a single, efficient token. This is why a single token often represents a variable-length chunk of text, like a sub-word. The tokenizer then maps each unique sub-word token to a discrete integer ID. The LLM performs all its complex math purely on these arrays of integers.

    The “Developer Tax”: Hidden Cost and Performance Penalties

    While standard English prose is tokenized efficiently, structural and technical data often is not. This leads to a hidden penalty known as the Developer Tax:

    • Structural Code & JSON Overhead: Tokenizers, trained on natural language, struggle with syntax like indentation, quotation marks, and consecutive spaces. A single indented line of JSON can cost three to four times the token budget of the same line written as flat text.
    • The Non-English Penalty: Because BPE relies on the character frequencies of its training data, non-English languages are often broken down into many more, smaller fragments. A phrase that takes 3 tokens in English might expand to 15 tokens when translated into Japanese or German, significantly increasing cost and cutting down the usable context window.

    Context Windows: The Engineering Equivalent of RAM

    The context window is often marketed as the maximum length of a document a model can read. For an engineer, it is best viewed as the maximum static RAM allocation available for a single, isolated execution.

    This window defines the hard ceiling for the combined size of the input prompt and the output response. Exceeding this limit by even one token will cause the API call to fail or the output to be abruptly cut off.

    Crucially, the time it takes the model to process the input scales poorly—it has an algorithmic complexity of O(N²) relative to the input length N. This means that if you double the length of your prompt, the computational time needed to process it quadruples. This is why managing token efficiency is a vital strategy for preventing latency degradation.

    Production Tip: Benchmarking Token Footprints

    To mitigate the Developer Tax, ensure you compile structural data like JSON into a minified format (no extra spaces, no indentation) before sending it to the model. This ensures your budget is spent on meaningful context, not wasted on structural whitespace.

    Controlling the Output: Demystifying Hyperparameters

    In traditional software, control flow is managed by conditionals and loops. In generative AI, you control the output behavior using hyperparameters, which are settings that change the mathematical rules for how the engine selects the next token.

    The Probability Pool (Logits) and the Softmax Step

    When the LLM is about to generate the next token, it first assigns a raw numerical score, called a logit, to every possible word or sub-word in its vocabulary.

    To make these raw scores usable, the model applies the Softmax function. This mathematical step converts all the raw scores (logits) into a clear probability distribution, ensuring all possibilities add up to 100%. This result is the ‘probability pool’ where every token has a precise chance of being selected.

    If the system simply chose the highest-probability token every time (a technique called greedy decoding), the output would be repetitive and robotic. To avoid this, developers adjust two primary controls: Temperature and Top-P.

    Temperature: The Creativity Dial

    Temperature (T) is a setting that controls how much randomness and variety the model uses when selecting the next word.

    • Temperature = 0.0 (Strictly Predictable): The most conservative setting. The model always selects the single most likely token. This ensures strict consistency—the same prompt always gives the same answer. Use this for strict tasks like code generation, data extraction, and schema compliance.
    • Temperature = 1.0 (Balanced Output): The default setting. The model mostly chooses likely words but allows for some statistical variety to make the language feel natural and less robotic. Use this for general conversation and writing.
    • High Temperature (T > 1.0) (High-Risk Creative Output): This makes the model highly adventurous, choosing statistically unlikely words. While great for brainstorming, it dramatically increases the risk of the model making up facts (hallucination), losing context, or producing nonsensical sentences.

    Top-P (Nucleus Sampling): Cutting Off the Nonsense

    While Temperature affects the spread of probabilities across all words, Top-P (or Nucleus Sampling) controls the size of the pool of words the model can choose from. It dynamically removes the words that are least likely to be relevant.

    How it works: Top-P ranks all available words by probability and then includes only the most probable words that collectively add up to your specified percentage (the ‘P’ value).

    Example: If you set Top-P to 0.90, the model creates a boundary that includes only the most probable words that make up 90% of the total likelihood. The remaining 10% of the vocabulary—the low-probability “tail”—is completely eliminated. This is a safety mechanism to ensure that even if the model is confused, it cannot pick a random, irrelevant word.

    Engineering Protocol: Because Temperature and Top-P both affect randomness, treat them as mutually exclusive controls. When tuning, set one to a neutral value (T=1.0 or Top-P=1.0) before adjusting the other.

    Production Use-CaseTarget TemperatureTarget Top-PExecution Profile
    SQL Query Generation & Schema Mapping0.01.0 (Locked)Strict determinism; eliminates syntax variations.
    JSON Extraction / Log Parsing0.01.0 (Locked)Maximize compliance with strict data schemas.
    RAG Summarization & Factual Q&A0.2 to 0.30.95Highly focused; minimizes the risk of factual fabrication.
    Customer Support Chat Routing0.5 to 0.70.90Balanced conversational flow with bounded vocabulary risks.
    Creative Copywriting & Brainstorming1.0 to 1.20.85High entropy; introduces unexpected associations while cutting off nonsense.

    Performance Metrics: Managing Latency and UX

    Unlike traditional APIs where a response time over 500ms is a bottleneck, LLM responses often take several seconds. To prevent user frustration and high churn rates, you must break down latency into its two distinct computational phases.

    Understanding Latency: Pre-fill vs. Decoding

    When you send a prompt, the LLM processes it in two phases:

    1. The Pre-fill Phase (Reading Your Prompt): In this first step, the model reads and processes all of your input text (instructions, context, and history) at once. Because the system knows every word upfront, the hardware (GPU) can process the entire block of text in parallel. This phase is highly efficient, though it slows down quadratically with longer prompts.
    2. The Decoding Phase (Writing the Response): Once the input is processed, the model starts writing the output. This must happen sequentially, one token at a time, because the model needs the previously generated token to predict the next one. This sequential bottleneck is almost always the slowest part of using an LLM.

    Streaming vs. Non-Streaming: Breaking the Blocking Pattern

    If you use the standard non-streaming REST pattern (where the client waits for the full payload before the server responds), your application will freeze. For example, if a 500-token summary takes 10 seconds to generate, your user will stare at a blank loading spinner for 10 seconds, leading to a poor user experience and potential HTTP 504 gateway timeouts.

    To build production-grade interfaces, you must transition to a streaming architecture. By configuring the API to stream, the LLM engine yields tokens to your application the exact millisecond they are generated in the decoding phase.

    Time-to-First-Token (TTFT) and Server-Sent Events (SSE)

    The gold-standard performance metric is Time-to-First-Token (TTFT). TTFT measures the duration between the request being sent and the application rendering the very first piece of generated text.

    While the total response might still take 10 seconds, a streaming connection can often bring the TTFT down to under 200 milliseconds. This immediate visual feedback completely changes the user’s perception of performance.

    The industry-standard protocol for delivering these token streams to web browsers is Server-Sent Events (SSE). SSE is a lightweight, unidirectional push over standard HTTP, making it simpler to implement than WebSockets.

    Production Architecture Note: If you route streamed tokens through a backend (like a reverse proxy), you must ensure that all downstream proxy components have response buffering disabled. If the proxy tries to buffer the response (e.g., to gzip it), your stream will choke, and you will revert back to a blocking, high-latency request.

    Building for Production: Best Practices for Clean Code

    Moving an LLM implementation from a prototype to production requires a shift from exploration to defensive systems design. Unhandled edge cases can lead to thread exhaustion, cascading API failures, and unexpected cloud costs.

    Deterministic Structures: Ditching the Unreliable Regex Method

    Early on, developers often asked models for structured data (like JSON) using a simple text prompt, and then used Regular Expressions (Regex) or simple string parsing to extract the data.

    This approach is highly unstable. Because LLMs are probabilistic, their output is never guaranteed to be perfect. A slight change—an added conversational phrase before the JSON, a missing bracket, or a variation in structure—will cause your Regex to fail and break your application at runtime.

    To ensure your application can reliably process LLM output, you must use features like Structured Outputs with strict schema enforcement (e.g., specifying a Pydantic or Zod schema).

    When you provide the API with a precise data blueprint, the model’s behavior is fundamentally changed. The engine uses your schema to mathematically limit the tokens it can choose. For instance, if your schema requires an integer, the model is physically prevented from outputting any non-numeric tokens. This guarantees the output perfectly matches your code’s expected data structure, eliminating parsing failures.

    The Production Checklist

    Before deploying any AI-assisted layer, your system architecture must address four core operational risks:

    Operational RiskProduction-Grade Mitigation StrategyConcrete Implementation Pattern
    Unbounded Latency / Hanging ThreadsHard Execution Timeouts & Circuit BreakersSet strict connection and read timeouts on your HTTP client (e.g., max 15s). Implement circuit breakers (like those found in libraries such as Resilience4j) to “fail fast” if the AI provider experiences unexpected latency spikes.
    API Throttling / Rate Limits (HTTP 429)Exponential Backoff with Random JitterNever retry failed calls immediately. Use an asynchronous retry queue that doubles the wait interval between attempts (2x seconds) and adds a randomized offset (jitter). This prevents thousands of worker threads from retrying simultaneously, which can cause a self-inflicted Distributed Denial of Service (DDoS) state.
    Token Cost & Memory BlowoutHard Ceiling Constraints & Client-Side TruncationAlways specify a max_tokens limit on every outgoing payload to prevent runaway generation bills. Prior to dispatch, use a library (like tiktoken) to programmatically prune or truncate old context arrays once they cross a designated safety threshold.
    Single-Point-of-Failure / Provider OutageGateway Abstraction LayerAvoid hardcoding specific provider client libraries in your core logic. Build or utilize an internal gateway interface. If your primary provider fails, your routing engine can dynamically fall back to an alternate model or cloud region without needing a code deployment.

    Clean code in AI engineering is not about writing clever prompts; it is about surrounding probabilistic engines with resilient, predictable infrastructure using standard distributed systems patterns. 

  • From Code to Cognition: An AI Guide for Software Developers

    From Code to Cognition: An AI Guide for Software Developers

    As software developers, we are used to being the ultimate source of logic in our applications. We write the code, define the database schemas, and establish the API contracts. But recently, a new paradigm has taken over the industry: Artificial Intelligence.

    If you feel overwhelmed by the sudden influx of math, statistics, and foreign terminology, you are not alone. This guide is designed to help you transition from traditional programming to AI, leveraging your existing software development mindset.

    Shifting the Paradigm: From If/Else to Probabilities

    For decades, software engineering has been deterministic. We write explicit Rules (code), feed in Data (inputs), and get a predictable Output. If a bug occurs, we trace the stack trace or step through a debugger to find the broken line of logic.

    Traditional Programming: Data + Rules ➔ Output

    Artificial Intelligence – specifically Machine Learning (ML) – flips this script entirely. Instead of coding the rules, we provide the system with Data and the desired Outputs. The AI algorithm uses these examples to statistically deduce the underlying Rules.

    Machine Learning: Data + Outputs ➔ Rules

    Once the system deduces these rules, it packages them into what we call a Model. You can think of a model as a compiled, black-box function that you can pass new data into to get a prediction.

    Why Developers are Uniquely Positioned for AI

    There is a common misconception that to work with AI, you need a PhD in mathematics or statistics. While that is true for the researchers designing new architectures, it is not true for the software engineers building applications with them.

    In fact, software developers are uniquely positioned to thrive in the AI era for several reasons:

    1. AI Needs an Ecosystem: A machine learning model is completely useless in isolation. It needs an API wrapper, a user interface, a database to store states, authentication, and secure cloud hosting. You already know how to build all of this.
    2. Data is Just State: Training or using an AI model requires data pipelines—ingesting, cleaning, transforming, and storing data. This is fundamentally a backend engineering and system design problem that developers solve every day.
    3. The Debugging Mindset: Interacting with AI (especially Large Language Models) is highly iterative. Prompt engineering, fine-tuning, and evaluating model outputs require the exact same logical, hypothesis-driven debugging process you use to fix a broken production build.
    4. Integration is the New Creation: Today, the most powerful AI capabilities are accessed via simple REST APIs or SDKs. If you know how to make an HTTP request and handle JSON payloads, you can build state-of-the-art AI features into your apps in minutes.

    Demystifying the Core Concepts: AI vs. ML vs. DL

    To navigate this landscape, it is helpful to think of AI, ML, and DL as nested namespaces.

    Artificial Intelligence (AI): The Global Namespace

    AI is the broadest umbrella. It refers to any system or technique that enables computers to mimic human intelligence or behavior. This includes things that aren’t modern “AI” at all—such as a complex, hardcoded if/else rules engine, or the classic pathfinding algorithms (like $A^*$) used in video games. If a machine mimics decision-making, it falls under AI.

    Machine Learning (ML): The Sub-Namespace

    ML is a specific subset of AI where the system learns patterns from data instead of relying on manually written rules.

    • The Developer Metaphor: Think of ML as writing code that can dynamically adjust its own configuration files based on the traffic it receives.
    • Limitations: Traditional ML algorithms work incredibly well on structured data (tabular data like CSVs). However, they require manual “feature engineering.” If you want an ML model to recognize fraudulent transactions, a developer must explicitly define and format the data inputs (e.g., transaction frequency, geographic distance).

    Deep Learning (DL): The Private Inner Class

    Deep Learning is a highly specialized subset of ML. It relies on Artificial Neural Networks—layers of mathematical functions styled roughly after the neurons in the human brain.

    • The Unstructured Data Breakthrough: Unlike traditional ML, Deep Learning does not need manual feature engineering. You can feed it raw, unstructured data—such as raw pixels of an image, audio recordings, or vast text files.
    • Modern Relevance: Almost every major AI breakthrough in the last decade—including Large Language Models (LLMs)—is a product of Deep Learning.

    The Modern AI Developer Stack: Prompting, RAG, and Fine-Tuning

    As an application developer, you do not need to compile neural networks or train base models from scratch. Instead, your job is to take incredibly powerful, pre-trained Foundation Models (like Gemini or GPT) and integrate them into your software products.

    There are three primary architectural patterns developers use to build AI products, ranging from easiest (and cheapest) to most complex:

    Prompt Engineering (The Application Layer)

    This is where every developer starts. You use the model out of the box and pass instructions and context directly in the API request (known as the “context window”).

    • How it works: You write a clean system prompt defining the persona, task, and formatting rules.
    • Developer Metaphor: Think of this as passing parameters to a highly flexible, open-ended function.
    • Best for: Sentiment analysis, translating formats (e.g., HTML to JSON), drafting emails, or simple Q&A.

    Retrieval-Augmented Generation (RAG) (The Database Layer)

    An LLM only knows what it was trained on. It doesn’t know about your user’s private data, database entries, or local API documentation. RAG solves this without changing the model itself.

    • How it works:
      • 1. A user asks a question.
      • 2. Your backend searches your traditional database or a specialized Vector Database (which stores data based on semantic meaning, not just exact keywords) for matching records.
      • 3. Your backend pulls the relevant records, injects them into the LLM prompt as context, and says: “Answer the user’s question using ONLY this retrieved data.”
    • Developer Metaphor: This is like giving an open-book exam to a genius. The genius (LLM) didn’t memorize your textbook, but you are handing them the exact pages they need to answer the question.
    • Best for: Building customer support chatbots that query company FAQs, searching through private codebase repositories, or analyzing user-specific PDF documents.

    Fine-Tuning (The Customization Layer)

    Fine-tuning involves taking a pre-trained foundation model and training it further on a specific, narrow dataset to change its core behavior, tone, or style.

    • How it works: You feed the model thousands of input-output pairs showing exactly how you want it to behave. This permanently changes some of the model’s internal weights.
    • Developer Metaphor: Think of this as writing a custom subclass. You inherit all the capabilities of the base class (the foundation model) but override specific methods to conform to highly unique behaviors.
    • Best for: Teaching a model a highly specific programming syntax, enforcing a strict brand voice, or optimizing performance for tiny, edge-device models.

    The Practical Integration Layer: APIs and LLMs

    As a software engineer, you interact with Large Language Models (LLMs) in two distinct ways:

    1. As a Consumer: Using AI-powered extensions to write, refactor, and debug your application.
    2. As a Builder: Integrating AI directly into your applications to solve complex business logic.

    These two modes are closely connected. The mental habits you build while consuming AI are exactly the skills you need to build with it.

    Consuming AI: The Prompt Engineering Mindset

    Let’s say you are writing a C# .NET API. You encounter an unexpected NullReferenceException in a complex LINQ query. You open GitHub Copilot, highlight the code block, and prompt it to find and fix the bug.

    To get a perfect fix from Copilot, you don’t just ask: “Fix this.” Instead, your brain automatically applies structured context:

    • The Goal: “Find and resolve the null reference exception in this query.”
    • The Context: You supply the exact method body and the database entity classes.
    • The Constraints: “Keep the database model unchanged, preserve our dependency injection pattern, and write a xUnit test covering the fix.”
    • The Expected Output: “Provide the corrected method and explain what caused the issue.”

    This structured feedback loop is Prompt Engineering. You are wrapping unstructured intent in explicit, deterministic boundaries.

    Building AI: Bringing LLMs into Your Own Code

    Once you understand how to prompt a tool like Copilot, you are ready to use those exact same principles to build AI capabilities inside your own applications.

    You do not need to build, train, or even host a neural network to make your software “intelligent.” Instead, you call LLM APIs (like Gemini, OpenAI, or Claude) directly from your code. In the .NET ecosystem, you can do this using standard HTTP requests, SDKs, or official orchestration libraries like Semantic Kernel or Microsoft.Extensions.AI.

    Here is an example of an ASP.NET Core API controller using a direct HttpClient request. It acts as an intelligent support agent, taking incoming, unstructured email text and classifying its sentiment and priority without a single hardcoded line of text parsing:

    using System.Net.Http.Json;
    
    using Microsoft.AspNetCore.Mvc;
    
    [ApiController]
    
    [Route("api/support")]
    
    public class SupportAgentController : ControllerBase
    
    {
    
        private readonly HttpClient _httpClient;
    
        private const string ApiKey = "YOUR_GEMINI_API_KEY";
    
        public SupportAgentController(HttpClient httpClient)
    
        {
    
            _httpClient = httpClient;
    
        }
    
        [HttpPost("classify")]
    
        public async Task<IActionResult> ClassifyTicket([FromBody] TicketRequest request)
    
        {
    
            // 1. Establish the System Prompt (The Rules)
    
            string systemInstruction = "You are a professional support ticket triager. " +
    
                                      "Analyze the ticket and return a JSON object with: " +
    
                                      "1. 'sentiment' (Positive, Neutral, Negative) " +
    
                                      "2. 'priority' (High, Medium, Low) " +
    
                                      "3. 'suggestedAction' (string) " +
    
                                      "Respond ONLY with the raw JSON string.";
    
            // 2. Prepare the payload (System prompt + User's Data)
    
            var payload = new
    
            {
    
                contents = new[] {
    
                    new { 
    
                        parts = new[] { 
    
                            new { text = $"{systemInstruction}\n\nTicket Text: {request.EmailContent}" } 
    
                        } 
    
                    }
    
                }
    
            };
    
            // 3. Make the API Call to the Foundation Model
    
            var response = await _httpClient.PostAsJsonAsync(
    
                $"[https://generativelanguage.googleapis.com/v1beta/models/gemini-2.5-flash-preview-09-2025:generateContent?key=](https://generativelanguage.googleapis.com/v1beta/models/gemini-2.5-flash-preview-09-2025:generateContent?key=){ApiKey}",
    
                payload
    
            );
    
            if (!response.IsSuccessStatusCode)
    
                return StatusCode(500, "AI Service Unavailable");
    
            var result = await response.Content.ReadFromJsonAsync<GeminiResponse>();
    
            string aiJsonResult = result?.Candidates?[0]?.Content?.Parts?[0]?.Text ?? "{}";
    
            // 4. Return the structured classification back to your deterministic system
    
            return Ok(aiJsonResult);
    
        }
    
    }
    
    public record TicketRequest(string EmailContent);
    
    public record GeminiResponse(Candidate[] Candidates);
    
    public record Candidate(Content Content);
    
    public record Content(Part[] Parts);
    
    public record Part(string Text);

    By hitting this endpoint, your traditional, deterministic C# code suddenly gains the ability to “understand” and structure natural language text. From here, you can feed that structured JSON directly into your traditional SQL databases or messaging queues.

    Conclusion: Embracing the Role of the AI Engineer

    The rise of AI does not mean the end of software developers. Rather, it represents evolution.

    In the past, we were limited to writing instructions that could only process perfect, structured data. If a user made a typo or sent an unstructured email, our code crashed or returned unreadable errors. Today, we can use LLM APIs as probabilistic adapters on top of our deterministic infrastructure.

    You don’t need a PhD to get started. You already have the most valuable skills in the AI ecosystem:

    • You know how to build secure, scalable backends.
    • You know how to format, sanitize, and validate API inputs and outputs.
    • You already debug using the exact same logical, step-by-step approach used in prompt engineering.

    Think of AI not as a threat, but as a new set of highly flexible APIs in your backend toolkit. Start small, experiment in your IDE with Copilot or any AI extension of your choice like Claude or Gemini, write your first system prompt, and begin bridging the gap from deterministic code to cognitive applications.

  • Copilot + MCP in VS Code: The Beginner Hands-On Guide to Supercharge Agent Mode

    If you have used GitHub Copilot mostly for inline code suggestions, you have only seen part of what it can do.

    With Agent mode in VS Code and MCP servers, Copilot can go beyond writing snippets. It can:

    • run tools,
    • interact with your terminal,
    • read and write files,
    • connect to external services,
    • and complete multi-step workflows from natural language prompts.

    This guide helps beginners build a strong mental model first, then walk through practical workflows you can actually run.

    TL;DR

    By the end of this guide, you will understand:

    • what MCP is and why it matters,
    • how Copilot Agent mode uses tools,
    • how to add and manage MCP servers in VS Code,
    • how to use GitHub MCP for issue-to-PR workflows,
    • how Playwright MCP helps with browser-driven automation,
    • how MarkItDown MCP converts documents and pages into Markdown,
    • how Hugging Face MCP unlocks practical AI tasks,
    • and how to combine multiple MCP servers without slowing your workflow.

    What MCP Is (in plain English)

    MCP (Model Context Protocol) is an open standard that lets AI agents connect to tools and data sources in a consistent way.

    Think of it like a universal adapter:

    • Copilot is the brain that understands your request.
    • MCP servers are capability providers (GitHub actions, browser automation, document conversion, model inference, and more).
    • Tools are the concrete actions exposed by each server.

    Without MCP, an AI assistant is mostly text-in/text-out. With MCP, it can operate in your development environment and external systems in a controlled way.

    How Copilot Agent Mode Works in VS Code

    Agent mode is not just chat. It is goal-oriented execution.

    When you ask for a task, Agent mode can:

    • break work into steps,
    • choose tools,
    • ask for approvals,
    • run terminal or MCP actions,
    • and report progress.

    Example: one prompt, full app bootstrap

    A beginner-friendly prompt:

    Create a basic Node.js blog API in this folder using Express.
    Include routes for list posts and create post.
    Install dependencies, create files, and run it locally.

    Expected behavior from Agent mode:

    1. Creates project files.
    2. Installs dependencies.
    3. Adds starter code.
    4. Runs the app.
    5. Shows what it changed.

    Why approvals matter

    By default, Copilot asks before running tools or commands. That is good for:

    • security,
    • cost awareness,
    • and avoiding accidental changes.

    You can use Bypass Approvals for speed, but beginners should keep approvals enabled until they trust the flow and understand each tool.

    Add and Connect MCP Servers in VS Code

    You can add MCP servers through VS Code command flow.

    Typical installation paths

    Use Command Palette and run:

    MCP: Add Server

    You will usually see options like:

    • STDIO server,
    • HTTP server,
    • NPM package,
    • PIP package,
    • Docker image.

    Where to discover servers

    A useful discovery point is the MCP organization and ecosystem listings on GitHub:

    • https://github.com/mcp

    Verify tools are available

    After adding servers:

    1. Open Copilot Agent chat.
    2. Click the Tools control.
    3. Select only tools needed for your current task.

    Important: selecting too many tools can reduce performance and increase irrelevant tool calls.

    GitHub MCP: End-to-End Developer Workflow

    Git workflows involve context switches: terminal, editor, GitHub UI, and back. GitHub MCP can reduce that churn.

    Workflow A: initialize a repo in an empty folder

    Prompt example:

    Initialize a new Git repository here, create a README.md with project setup notes,
    make the first commit, and suggest a branch naming convention for features.

    What Agent mode can do:

    • run git init,
    • create README,
    • stage and commit,
    • suggest conventions like feature/, fix/, chore/*.

    Workflow B: create an issue from VS Code

    Prompt example:

    Using GitHub MCP, create an issue titled:
    "Add login page validation"
    Include acceptance criteria and a checklist.

    This lets you stay in VS Code while creating actionable issue content.

    Workflow C: issue -> branch -> PR

    Prompt example:

    Use GitHub MCP to:
    1) read issue #42,
    2) create a branch named feature/42-login-validation,
    3) draft the implementation plan,
    4) create a pull request after commits are ready.

    If your tool set supports tool targeting, you can force a specific action style with tool references such as:

    Please use #issue_read for issue context, then prepare branch and PR steps.

    Workflow D: review, approve, merge

    Prompt example:

    Review the open PR for issue #42.
    Summarize risks, request changes if needed,
    and if checks pass and review is clean, approve and merge.

    Why this is powerful: you describe intent in natural language, and tools execute the mechanical steps.

    Playwright MCP: Browser Automation by Prompt

    Playwright MCP exposes browser automation abilities to Agent mode. This is useful for testing, scraping permitted public data, and visual validation.

    Scenario 1: fetch data from a live site and save JSON

    Prompt example:

    Use Playwright MCP to open example.com, capture the page title and all h1/h2 text,
    and save results to data/example-headings.json.

    Expected artifacts:

    • a JSON file in your workspace,
    • optional script or log showing how data was captured.

    Scenario 2: take a screenshot with natural language

    Prompt example:

    Use Playwright MCP to open example.com and save a full-page screenshot to
    artifacts/example-homepage.png.

    Scenario 3: create content then visually confirm it

    Prompt example:

    Create a blog post in this local project titled "MCP Quick Test".
    Then use Playwright MCP to open the blog list page and take a screenshot
    showing the new post is visible.

    This is a great beginner pattern: ask Copilot to both make the change and verify the result.

    MarkItDown MCP: Convert Content into Structured Markdown

    MarkItDown MCP is extremely practical for teams that standardize docs in Markdown.

    Scenario 1: convert a web page into Markdown

    Prompt example:

    Use MarkItDown MCP to convert this page to Markdown:
    https://example.com/docs/getting-started
    Save it as docs/getting-started.md.

    Scenario 2: convert a PDF into Markdown

    Prompt example:

    Use MarkItDown MCP to convert files/sample-order.pdf to Markdown.
    Save output as docs/sample-order.md and preserve headings and tables.

    Use case: turning requirements docs, invoices, briefs, or exported PDFs into searchable version-controlled text.

    Hugging Face MCP: Practical AI from VS Code

    Hugging Face MCP lets Copilot call model-related tools from your editor workflow.

    Step 1: prepare account and token

    1. Create a free Hugging Face account.
    2. Generate an API token in account settings.
    3. Configure that token in MCP inputs.

    Step 2: verify connection

    Once configured, a tool like hf_whoami should return your account identity.

    Prompt example:

    Use the Hugging Face MCP tool hf_whoami and confirm my account is connected.

    Step 3: run beginner AI tasks

    Sentiment analysis

    Prompt example:

    Use Hugging Face MCP to run sentiment analysis on:
    "The onboarding was smooth, but setup docs are still confusing."
    Return label and confidence.

    List top models into Markdown

    Prompt example:

    Using Hugging Face MCP, list 10 popular models for text classification.
    Create docs/top-10-text-classification-models.md with short descriptions.

    Text-to-image generation

    Prompt example:

    Use a Hugging Face text-to-image model to generate:
    "sunset over the mountains, cinematic light, high detail"
    Save output to artifacts/sunset-mountains.png.

    RFP-to-model recommendation

    Prompt example:

    Read docs/rfp-nlp-project.md and recommend the best Hugging Face models
    for the requirements. Include trade-offs, cost/performance notes,
    and one primary recommendation.

    Managing MCP Servers with mcp.json

    As your setup grows, mcp.json becomes your control center.

    User-level vs project-level config

    • User-level mcp.json: personal defaults across projects.
    • Project-level .vscode/mcp.json: shared team setup inside a repository.

    For team consistency, prefer project-level config (excluding secrets from source control when needed).

    mcp.json anatomy

    Typical shape:

    {
      "inputs": {
        "HF_API_KEY": {
          "type": "string",
          "description": "Hugging Face API token"
        }
      },
      "servers": {
        "huggingface": {
          "type": "http",
          "url": "https://your-hf-mcp-endpoint.example",
          "headers": {
            "Authorization": "Bearer ${inputs.HF_API_KEY}"
          }
        },
        "github": {
          "type": "npm",
          "package": "@example/github-mcp-server"
        }
      }
    }

    Key points:

    • inputs stores reusable values like API tokens.
    • servers defines each MCP server and connection type.
    • reference inputs in server config using interpolation.

    Combining MCP Servers for Real Workflows

    This is where MCP becomes more than convenience.

    Example: repo intelligence pipeline

    Goal: generate a weekly engineering report from repository activity.

    Flow:

    1. GitHub MCP reads latest issues and PR summaries.
    2. Hugging Face MCP classifies themes (bug, performance, docs, feature).
    3. MarkItDown MCP converts final output to a polished Markdown report.

    Prompt example:

    Use GitHub MCP to collect this week's merged PR titles and summaries.
    Use Hugging Face MCP to classify each PR into a category.
    Then create docs/weekly-engineering-report.md with a summary table and insights.

    Performance and Safety Best Practices

    1) Keep tool selection tight

    Enable only tools relevant to your current task. Large tool sets can increase latency and wrong tool choices.

    2) Be explicit in prompts

    Good prompt structure:

    • objective,
    • target files,
    • constraints,
    • expected output format.

    3) Use tool targeting when supported

    If your environment supports tool references, direct Copilot with targeted tags like #issue_read for precision.

    4) Keep approvals on while learning

    Approvals help you understand what will run before it runs.

    5) Protect credentials

    • Store secrets in inputs or secure secret stores.
    • Never hardcode API keys in committed files.
    • Use least privilege tokens.

    6) Build repeatable workflows

    Once a flow works, save it as:

    • a prompt template,
    • a team guide,
    • or automation docs.

    Beginner Pitfalls to Avoid

    • Enabling every MCP server at once and expecting faster outcomes.
    • Vague prompts without output paths.
    • Turning off approvals before understanding tool behavior.
    • Storing tokens directly in tracked files.
    • Assuming one model/server is best for all tasks.

    FAQ

    Is MCP required to use Copilot?

    No. Copilot works without MCP. MCP adds external tools and data capabilities.

    Will MCP replace terminal skills?

    Not entirely. It reduces command memorization, but terminal fundamentals still help with debugging and trust.

    Is it safe to enable Bypass Approvals?

    It can be, for trusted workflows. Beginners should keep approvals enabled until they are comfortable with each tool’s behavior.

    Can I use multiple MCP servers in one task?

    Yes, and that is one of the biggest advantages. Just limit active tools to what the task needs.

    Where should team MCP configuration live?

    Use project-level .vscode/mcp.json for shared setup, plus secure handling for secrets.

    Final Thoughts

    MCP changes Copilot from a coding assistant into an execution-capable teammate.

    For beginners, the winning path is simple:

    1. Start with one server.
    2. Keep approvals on.
    3. Use explicit prompts.
    4. Add multi-server workflows once each piece is reliable.

    If you follow this progression, you will move from “asking for snippets” to “orchestrating real outcomes” directly inside VS Code.

    References

    • Model Context Protocol: https://modelcontextprotocol.io
    • MCP ecosystem on GitHub: https://github.com/mcp
    • GitHub Copilot docs: https://docs.github.com/copilot
    • VS Code docs: https://code.visualstudio.com/docs
    • Playwright docs: https://playwright.dev
    • Hugging Face docs: https://huggingface.co/docs