Blog

  • From Code to Cognition: An AI Guide for Software Developers

    From Code to Cognition: An AI Guide for Software Developers

    As software developers, we are used to being the ultimate source of logic in our applications. We write the code, define the database schemas, and establish the API contracts. But recently, a new paradigm has taken over the industry: Artificial Intelligence.

    If you feel overwhelmed by the sudden influx of math, statistics, and foreign terminology, you are not alone. This guide is designed to help you transition from traditional programming to AI, leveraging your existing software development mindset.

    Shifting the Paradigm: From If/Else to Probabilities

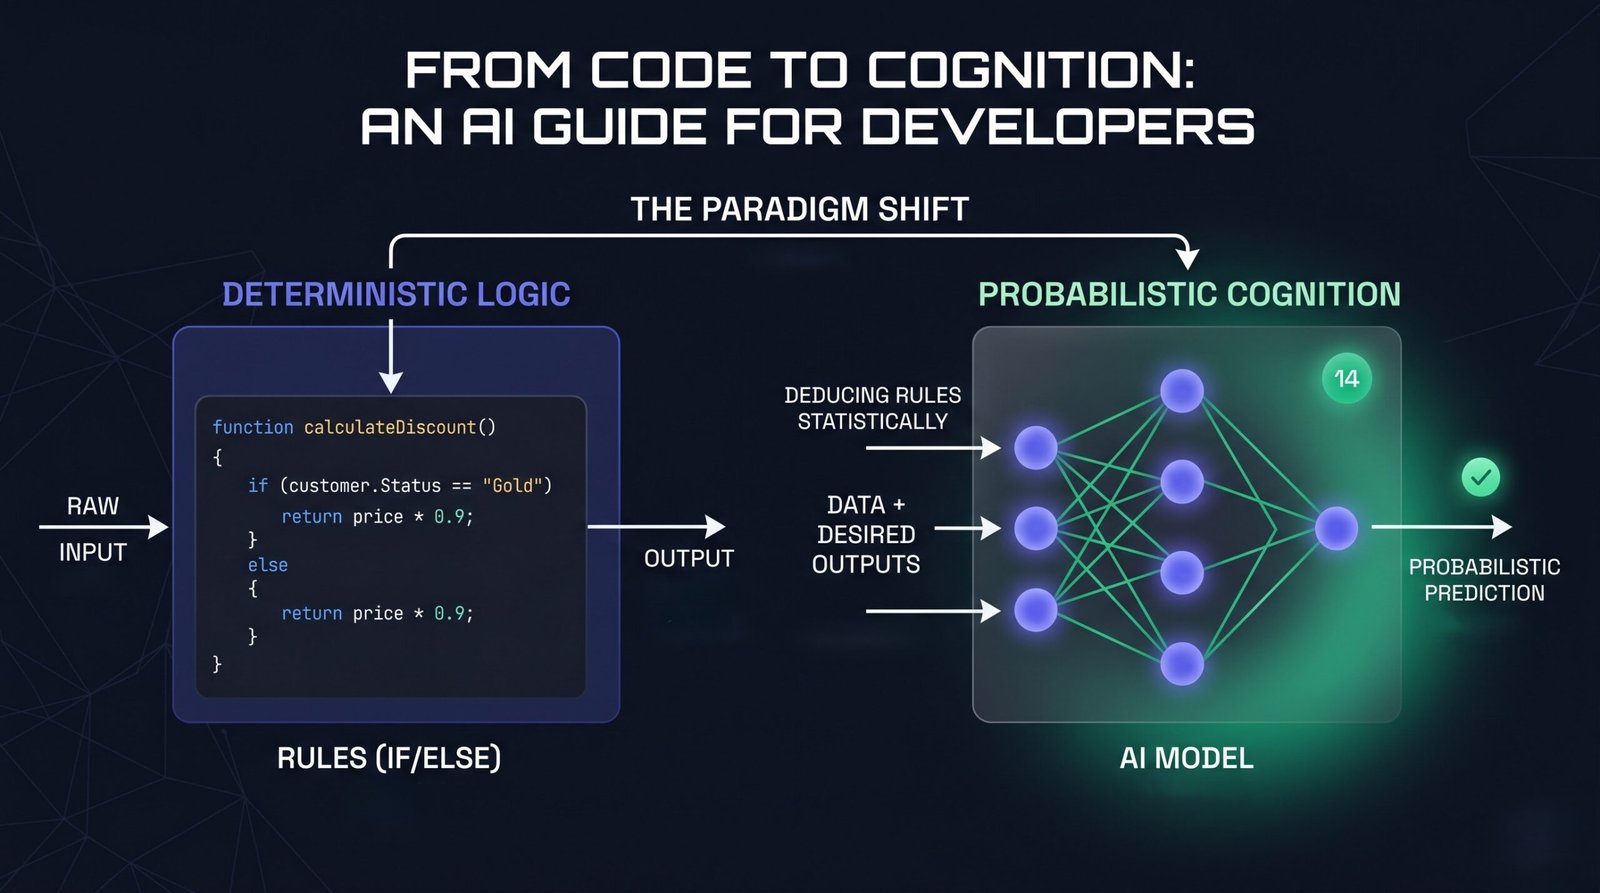
    For decades, software engineering has been deterministic. We write explicit Rules (code), feed in Data (inputs), and get a predictable Output. If a bug occurs, we trace the stack trace or step through a debugger to find the broken line of logic.

    Traditional Programming: Data + Rules ➔ Output

    Artificial Intelligence – specifically Machine Learning (ML) – flips this script entirely. Instead of coding the rules, we provide the system with Data and the desired Outputs. The AI algorithm uses these examples to statistically deduce the underlying Rules.

    Machine Learning: Data + Outputs ➔ Rules

    Once the system deduces these rules, it packages them into what we call a Model. You can think of a model as a compiled, black-box function that you can pass new data into to get a prediction.

    Why Developers are Uniquely Positioned for AI

    There is a common misconception that to work with AI, you need a PhD in mathematics or statistics. While that is true for the researchers designing new architectures, it is not true for the software engineers building applications with them.

    In fact, software developers are uniquely positioned to thrive in the AI era for several reasons:

    1. AI Needs an Ecosystem: A machine learning model is completely useless in isolation. It needs an API wrapper, a user interface, a database to store states, authentication, and secure cloud hosting. You already know how to build all of this.
    2. Data is Just State: Training or using an AI model requires data pipelines—ingesting, cleaning, transforming, and storing data. This is fundamentally a backend engineering and system design problem that developers solve every day.
    3. The Debugging Mindset: Interacting with AI (especially Large Language Models) is highly iterative. Prompt engineering, fine-tuning, and evaluating model outputs require the exact same logical, hypothesis-driven debugging process you use to fix a broken production build.
    4. Integration is the New Creation: Today, the most powerful AI capabilities are accessed via simple REST APIs or SDKs. If you know how to make an HTTP request and handle JSON payloads, you can build state-of-the-art AI features into your apps in minutes.

    Demystifying the Core Concepts: AI vs. ML vs. DL

    To navigate this landscape, it is helpful to think of AI, ML, and DL as nested namespaces.

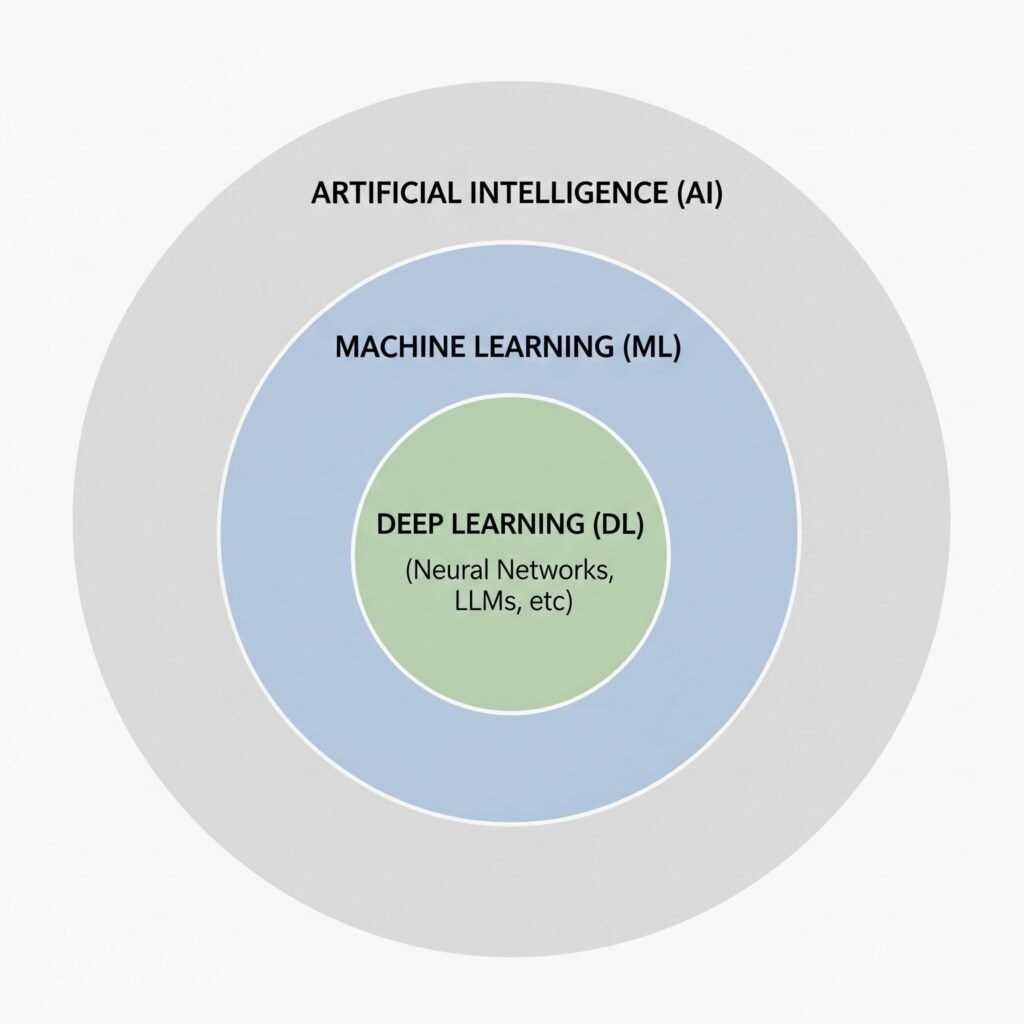
    Artificial Intelligence (AI): The Global Namespace

    AI is the broadest umbrella. It refers to any system or technique that enables computers to mimic human intelligence or behavior. This includes things that aren’t modern “AI” at all—such as a complex, hardcoded if/else rules engine, or the classic pathfinding algorithms (like $A^*$) used in video games. If a machine mimics decision-making, it falls under AI.

    Machine Learning (ML): The Sub-Namespace

    ML is a specific subset of AI where the system learns patterns from data instead of relying on manually written rules.

    • The Developer Metaphor: Think of ML as writing code that can dynamically adjust its own configuration files based on the traffic it receives.
    • Limitations: Traditional ML algorithms work incredibly well on structured data (tabular data like CSVs). However, they require manual “feature engineering.” If you want an ML model to recognize fraudulent transactions, a developer must explicitly define and format the data inputs (e.g., transaction frequency, geographic distance).

    Deep Learning (DL): The Private Inner Class

    Deep Learning is a highly specialized subset of ML. It relies on Artificial Neural Networks—layers of mathematical functions styled roughly after the neurons in the human brain.

    • The Unstructured Data Breakthrough: Unlike traditional ML, Deep Learning does not need manual feature engineering. You can feed it raw, unstructured data—such as raw pixels of an image, audio recordings, or vast text files.
    • Modern Relevance: Almost every major AI breakthrough in the last decade—including Large Language Models (LLMs)—is a product of Deep Learning.

    The Modern AI Developer Stack: Prompting, RAG, and Fine-Tuning

    As an application developer, you do not need to compile neural networks or train base models from scratch. Instead, your job is to take incredibly powerful, pre-trained Foundation Models (like Gemini or GPT) and integrate them into your software products.

    There are three primary architectural patterns developers use to build AI products, ranging from easiest (and cheapest) to most complex:

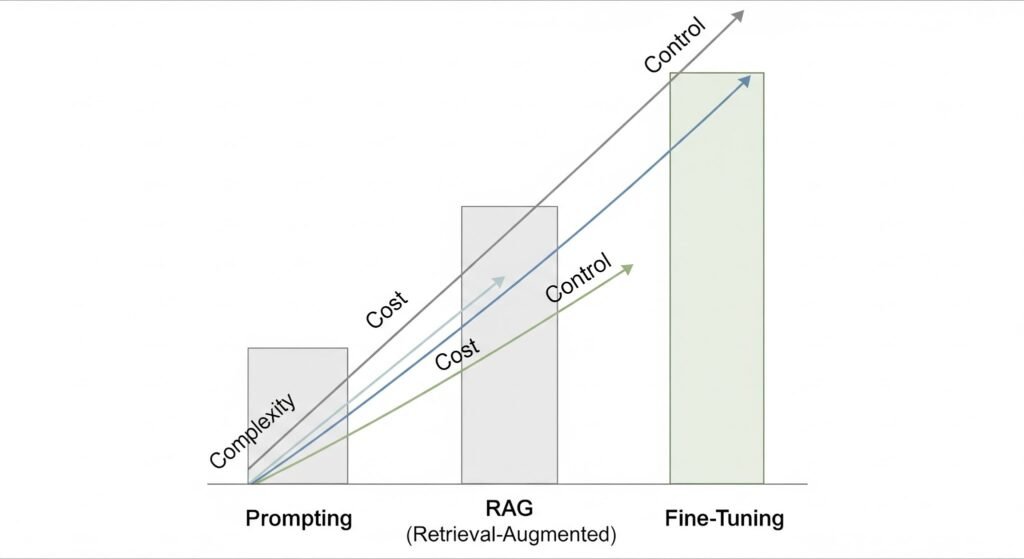
    Prompt Engineering (The Application Layer)

    This is where every developer starts. You use the model out of the box and pass instructions and context directly in the API request (known as the “context window”).

    • How it works: You write a clean system prompt defining the persona, task, and formatting rules.
    • Developer Metaphor: Think of this as passing parameters to a highly flexible, open-ended function.
    • Best for: Sentiment analysis, translating formats (e.g., HTML to JSON), drafting emails, or simple Q&A.

    Retrieval-Augmented Generation (RAG) (The Database Layer)

    An LLM only knows what it was trained on. It doesn’t know about your user’s private data, database entries, or local API documentation. RAG solves this without changing the model itself.

    • How it works:
      • 1. A user asks a question.
      • 2. Your backend searches your traditional database or a specialized Vector Database (which stores data based on semantic meaning, not just exact keywords) for matching records.
      • 3. Your backend pulls the relevant records, injects them into the LLM prompt as context, and says: “Answer the user’s question using ONLY this retrieved data.”
    • Developer Metaphor: This is like giving an open-book exam to a genius. The genius (LLM) didn’t memorize your textbook, but you are handing them the exact pages they need to answer the question.
    • Best for: Building customer support chatbots that query company FAQs, searching through private codebase repositories, or analyzing user-specific PDF documents.

    Fine-Tuning (The Customization Layer)

    Fine-tuning involves taking a pre-trained foundation model and training it further on a specific, narrow dataset to change its core behavior, tone, or style.

    • How it works: You feed the model thousands of input-output pairs showing exactly how you want it to behave. This permanently changes some of the model’s internal weights.
    • Developer Metaphor: Think of this as writing a custom subclass. You inherit all the capabilities of the base class (the foundation model) but override specific methods to conform to highly unique behaviors.
    • Best for: Teaching a model a highly specific programming syntax, enforcing a strict brand voice, or optimizing performance for tiny, edge-device models.

    The Practical Integration Layer: APIs and LLMs

    As a software engineer, you interact with Large Language Models (LLMs) in two distinct ways:

    1. As a Consumer: Using AI-powered extensions to write, refactor, and debug your application.
    2. As a Builder: Integrating AI directly into your applications to solve complex business logic.

    These two modes are closely connected. The mental habits you build while consuming AI are exactly the skills you need to build with it.

    Consuming AI: The Prompt Engineering Mindset

    Let’s say you are writing a C# .NET API. You encounter an unexpected NullReferenceException in a complex LINQ query. You open GitHub Copilot, highlight the code block, and prompt it to find and fix the bug.

    To get a perfect fix from Copilot, you don’t just ask: “Fix this.” Instead, your brain automatically applies structured context:

    • The Goal: “Find and resolve the null reference exception in this query.”
    • The Context: You supply the exact method body and the database entity classes.
    • The Constraints: “Keep the database model unchanged, preserve our dependency injection pattern, and write a xUnit test covering the fix.”
    • The Expected Output: “Provide the corrected method and explain what caused the issue.”

    This structured feedback loop is Prompt Engineering. You are wrapping unstructured intent in explicit, deterministic boundaries.

    Building AI: Bringing LLMs into Your Own Code

    Once you understand how to prompt a tool like Copilot, you are ready to use those exact same principles to build AI capabilities inside your own applications.

    You do not need to build, train, or even host a neural network to make your software “intelligent.” Instead, you call LLM APIs (like Gemini, OpenAI, or Claude) directly from your code. In the .NET ecosystem, you can do this using standard HTTP requests, SDKs, or official orchestration libraries like Semantic Kernel or Microsoft.Extensions.AI.

    Here is an example of an ASP.NET Core API controller using a direct HttpClient request. It acts as an intelligent support agent, taking incoming, unstructured email text and classifying its sentiment and priority without a single hardcoded line of text parsing:

    using System.Net.Http.Json;
    
    using Microsoft.AspNetCore.Mvc;
    
    [ApiController]
    
    [Route("api/support")]
    
    public class SupportAgentController : ControllerBase
    
    {
    
        private readonly HttpClient _httpClient;
    
        private const string ApiKey = "YOUR_GEMINI_API_KEY";
    
        public SupportAgentController(HttpClient httpClient)
    
        {
    
            _httpClient = httpClient;
    
        }
    
        [HttpPost("classify")]
    
        public async Task<IActionResult> ClassifyTicket([FromBody] TicketRequest request)
    
        {
    
            // 1. Establish the System Prompt (The Rules)
    
            string systemInstruction = "You are a professional support ticket triager. " +
    
                                      "Analyze the ticket and return a JSON object with: " +
    
                                      "1. 'sentiment' (Positive, Neutral, Negative) " +
    
                                      "2. 'priority' (High, Medium, Low) " +
    
                                      "3. 'suggestedAction' (string) " +
    
                                      "Respond ONLY with the raw JSON string.";
    
            // 2. Prepare the payload (System prompt + User's Data)
    
            var payload = new
    
            {
    
                contents = new[] {
    
                    new { 
    
                        parts = new[] { 
    
                            new { text = $"{systemInstruction}\n\nTicket Text: {request.EmailContent}" } 
    
                        } 
    
                    }
    
                }
    
            };
    
            // 3. Make the API Call to the Foundation Model
    
            var response = await _httpClient.PostAsJsonAsync(
    
                $"[https://generativelanguage.googleapis.com/v1beta/models/gemini-2.5-flash-preview-09-2025:generateContent?key=](https://generativelanguage.googleapis.com/v1beta/models/gemini-2.5-flash-preview-09-2025:generateContent?key=){ApiKey}",
    
                payload
    
            );
    
            if (!response.IsSuccessStatusCode)
    
                return StatusCode(500, "AI Service Unavailable");
    
            var result = await response.Content.ReadFromJsonAsync<GeminiResponse>();
    
            string aiJsonResult = result?.Candidates?[0]?.Content?.Parts?[0]?.Text ?? "{}";
    
            // 4. Return the structured classification back to your deterministic system
    
            return Ok(aiJsonResult);
    
        }
    
    }
    
    public record TicketRequest(string EmailContent);
    
    public record GeminiResponse(Candidate[] Candidates);
    
    public record Candidate(Content Content);
    
    public record Content(Part[] Parts);
    
    public record Part(string Text);

    By hitting this endpoint, your traditional, deterministic C# code suddenly gains the ability to “understand” and structure natural language text. From here, you can feed that structured JSON directly into your traditional SQL databases or messaging queues.

    Conclusion: Embracing the Role of the AI Engineer

    The rise of AI does not mean the end of software developers. Rather, it represents evolution.

    In the past, we were limited to writing instructions that could only process perfect, structured data. If a user made a typo or sent an unstructured email, our code crashed or returned unreadable errors. Today, we can use LLM APIs as probabilistic adapters on top of our deterministic infrastructure.

    You don’t need a PhD to get started. You already have the most valuable skills in the AI ecosystem:

    • You know how to build secure, scalable backends.
    • You know how to format, sanitize, and validate API inputs and outputs.
    • You already debug using the exact same logical, step-by-step approach used in prompt engineering.

    Think of AI not as a threat, but as a new set of highly flexible APIs in your backend toolkit. Start small, experiment in your IDE with Copilot or any AI extension of your choice like Claude or Gemini, write your first system prompt, and begin bridging the gap from deterministic code to cognitive applications.

  • Copilot + MCP in VS Code: The Beginner Hands-On Guide to Supercharge Agent Mode

    If you have used GitHub Copilot mostly for inline code suggestions, you have only seen part of what it can do.

    With Agent mode in VS Code and MCP servers, Copilot can go beyond writing snippets. It can:

    • run tools,
    • interact with your terminal,
    • read and write files,
    • connect to external services,
    • and complete multi-step workflows from natural language prompts.

    This guide helps beginners build a strong mental model first, then walk through practical workflows you can actually run.

    TL;DR

    By the end of this guide, you will understand:

    • what MCP is and why it matters,
    • how Copilot Agent mode uses tools,
    • how to add and manage MCP servers in VS Code,
    • how to use GitHub MCP for issue-to-PR workflows,
    • how Playwright MCP helps with browser-driven automation,
    • how MarkItDown MCP converts documents and pages into Markdown,
    • how Hugging Face MCP unlocks practical AI tasks,
    • and how to combine multiple MCP servers without slowing your workflow.

    What MCP Is (in plain English)

    MCP (Model Context Protocol) is an open standard that lets AI agents connect to tools and data sources in a consistent way.

    Think of it like a universal adapter:

    • Copilot is the brain that understands your request.
    • MCP servers are capability providers (GitHub actions, browser automation, document conversion, model inference, and more).
    • Tools are the concrete actions exposed by each server.

    Without MCP, an AI assistant is mostly text-in/text-out. With MCP, it can operate in your development environment and external systems in a controlled way.

    How Copilot Agent Mode Works in VS Code

    Agent mode is not just chat. It is goal-oriented execution.

    When you ask for a task, Agent mode can:

    • break work into steps,
    • choose tools,
    • ask for approvals,
    • run terminal or MCP actions,
    • and report progress.

    Example: one prompt, full app bootstrap

    A beginner-friendly prompt:

    Create a basic Node.js blog API in this folder using Express.
    Include routes for list posts and create post.
    Install dependencies, create files, and run it locally.

    Expected behavior from Agent mode:

    1. Creates project files.
    2. Installs dependencies.
    3. Adds starter code.
    4. Runs the app.
    5. Shows what it changed.

    Why approvals matter

    By default, Copilot asks before running tools or commands. That is good for:

    • security,
    • cost awareness,
    • and avoiding accidental changes.

    You can use Bypass Approvals for speed, but beginners should keep approvals enabled until they trust the flow and understand each tool.

    Add and Connect MCP Servers in VS Code

    You can add MCP servers through VS Code command flow.

    Typical installation paths

    Use Command Palette and run:

    MCP: Add Server

    You will usually see options like:

    • STDIO server,
    • HTTP server,
    • NPM package,
    • PIP package,
    • Docker image.

    Where to discover servers

    A useful discovery point is the MCP organization and ecosystem listings on GitHub:

    • https://github.com/mcp

    Verify tools are available

    After adding servers:

    1. Open Copilot Agent chat.
    2. Click the Tools control.
    3. Select only tools needed for your current task.

    Important: selecting too many tools can reduce performance and increase irrelevant tool calls.

    GitHub MCP: End-to-End Developer Workflow

    Git workflows involve context switches: terminal, editor, GitHub UI, and back. GitHub MCP can reduce that churn.

    Workflow A: initialize a repo in an empty folder

    Prompt example:

    Initialize a new Git repository here, create a README.md with project setup notes,
    make the first commit, and suggest a branch naming convention for features.

    What Agent mode can do:

    • run git init,
    • create README,
    • stage and commit,
    • suggest conventions like feature/, fix/, chore/*.

    Workflow B: create an issue from VS Code

    Prompt example:

    Using GitHub MCP, create an issue titled:
    "Add login page validation"
    Include acceptance criteria and a checklist.

    This lets you stay in VS Code while creating actionable issue content.

    Workflow C: issue -> branch -> PR

    Prompt example:

    Use GitHub MCP to:
    1) read issue #42,
    2) create a branch named feature/42-login-validation,
    3) draft the implementation plan,
    4) create a pull request after commits are ready.

    If your tool set supports tool targeting, you can force a specific action style with tool references such as:

    Please use #issue_read for issue context, then prepare branch and PR steps.

    Workflow D: review, approve, merge

    Prompt example:

    Review the open PR for issue #42.
    Summarize risks, request changes if needed,
    and if checks pass and review is clean, approve and merge.

    Why this is powerful: you describe intent in natural language, and tools execute the mechanical steps.

    Playwright MCP: Browser Automation by Prompt

    Playwright MCP exposes browser automation abilities to Agent mode. This is useful for testing, scraping permitted public data, and visual validation.

    Scenario 1: fetch data from a live site and save JSON

    Prompt example:

    Use Playwright MCP to open example.com, capture the page title and all h1/h2 text,
    and save results to data/example-headings.json.

    Expected artifacts:

    • a JSON file in your workspace,
    • optional script or log showing how data was captured.

    Scenario 2: take a screenshot with natural language

    Prompt example:

    Use Playwright MCP to open example.com and save a full-page screenshot to
    artifacts/example-homepage.png.

    Scenario 3: create content then visually confirm it

    Prompt example:

    Create a blog post in this local project titled "MCP Quick Test".
    Then use Playwright MCP to open the blog list page and take a screenshot
    showing the new post is visible.

    This is a great beginner pattern: ask Copilot to both make the change and verify the result.

    MarkItDown MCP: Convert Content into Structured Markdown

    MarkItDown MCP is extremely practical for teams that standardize docs in Markdown.

    Scenario 1: convert a web page into Markdown

    Prompt example:

    Use MarkItDown MCP to convert this page to Markdown:
    https://example.com/docs/getting-started
    Save it as docs/getting-started.md.

    Scenario 2: convert a PDF into Markdown

    Prompt example:

    Use MarkItDown MCP to convert files/sample-order.pdf to Markdown.
    Save output as docs/sample-order.md and preserve headings and tables.

    Use case: turning requirements docs, invoices, briefs, or exported PDFs into searchable version-controlled text.

    Hugging Face MCP: Practical AI from VS Code

    Hugging Face MCP lets Copilot call model-related tools from your editor workflow.

    Step 1: prepare account and token

    1. Create a free Hugging Face account.
    2. Generate an API token in account settings.
    3. Configure that token in MCP inputs.

    Step 2: verify connection

    Once configured, a tool like hf_whoami should return your account identity.

    Prompt example:

    Use the Hugging Face MCP tool hf_whoami and confirm my account is connected.

    Step 3: run beginner AI tasks

    Sentiment analysis

    Prompt example:

    Use Hugging Face MCP to run sentiment analysis on:
    "The onboarding was smooth, but setup docs are still confusing."
    Return label and confidence.

    List top models into Markdown

    Prompt example:

    Using Hugging Face MCP, list 10 popular models for text classification.
    Create docs/top-10-text-classification-models.md with short descriptions.

    Text-to-image generation

    Prompt example:

    Use a Hugging Face text-to-image model to generate:
    "sunset over the mountains, cinematic light, high detail"
    Save output to artifacts/sunset-mountains.png.

    RFP-to-model recommendation

    Prompt example:

    Read docs/rfp-nlp-project.md and recommend the best Hugging Face models
    for the requirements. Include trade-offs, cost/performance notes,
    and one primary recommendation.

    Managing MCP Servers with mcp.json

    As your setup grows, mcp.json becomes your control center.

    User-level vs project-level config

    • User-level mcp.json: personal defaults across projects.
    • Project-level .vscode/mcp.json: shared team setup inside a repository.

    For team consistency, prefer project-level config (excluding secrets from source control when needed).

    mcp.json anatomy

    Typical shape:

    {
      "inputs": {
        "HF_API_KEY": {
          "type": "string",
          "description": "Hugging Face API token"
        }
      },
      "servers": {
        "huggingface": {
          "type": "http",
          "url": "https://your-hf-mcp-endpoint.example",
          "headers": {
            "Authorization": "Bearer ${inputs.HF_API_KEY}"
          }
        },
        "github": {
          "type": "npm",
          "package": "@example/github-mcp-server"
        }
      }
    }

    Key points:

    • inputs stores reusable values like API tokens.
    • servers defines each MCP server and connection type.
    • reference inputs in server config using interpolation.

    Combining MCP Servers for Real Workflows

    This is where MCP becomes more than convenience.

    Example: repo intelligence pipeline

    Goal: generate a weekly engineering report from repository activity.

    Flow:

    1. GitHub MCP reads latest issues and PR summaries.
    2. Hugging Face MCP classifies themes (bug, performance, docs, feature).
    3. MarkItDown MCP converts final output to a polished Markdown report.

    Prompt example:

    Use GitHub MCP to collect this week's merged PR titles and summaries.
    Use Hugging Face MCP to classify each PR into a category.
    Then create docs/weekly-engineering-report.md with a summary table and insights.

    Performance and Safety Best Practices

    1) Keep tool selection tight

    Enable only tools relevant to your current task. Large tool sets can increase latency and wrong tool choices.

    2) Be explicit in prompts

    Good prompt structure:

    • objective,
    • target files,
    • constraints,
    • expected output format.

    3) Use tool targeting when supported

    If your environment supports tool references, direct Copilot with targeted tags like #issue_read for precision.

    4) Keep approvals on while learning

    Approvals help you understand what will run before it runs.

    5) Protect credentials

    • Store secrets in inputs or secure secret stores.
    • Never hardcode API keys in committed files.
    • Use least privilege tokens.

    6) Build repeatable workflows

    Once a flow works, save it as:

    • a prompt template,
    • a team guide,
    • or automation docs.

    Beginner Pitfalls to Avoid

    • Enabling every MCP server at once and expecting faster outcomes.
    • Vague prompts without output paths.
    • Turning off approvals before understanding tool behavior.
    • Storing tokens directly in tracked files.
    • Assuming one model/server is best for all tasks.

    FAQ

    Is MCP required to use Copilot?

    No. Copilot works without MCP. MCP adds external tools and data capabilities.

    Will MCP replace terminal skills?

    Not entirely. It reduces command memorization, but terminal fundamentals still help with debugging and trust.

    Is it safe to enable Bypass Approvals?

    It can be, for trusted workflows. Beginners should keep approvals enabled until they are comfortable with each tool’s behavior.

    Can I use multiple MCP servers in one task?

    Yes, and that is one of the biggest advantages. Just limit active tools to what the task needs.

    Where should team MCP configuration live?

    Use project-level .vscode/mcp.json for shared setup, plus secure handling for secrets.

    Final Thoughts

    MCP changes Copilot from a coding assistant into an execution-capable teammate.

    For beginners, the winning path is simple:

    1. Start with one server.
    2. Keep approvals on.
    3. Use explicit prompts.
    4. Add multi-server workflows once each piece is reliable.

    If you follow this progression, you will move from “asking for snippets” to “orchestrating real outcomes” directly inside VS Code.

    References

    • Model Context Protocol: https://modelcontextprotocol.io
    • MCP ecosystem on GitHub: https://github.com/mcp
    • GitHub Copilot docs: https://docs.github.com/copilot
    • VS Code docs: https://code.visualstudio.com/docs
    • Playwright docs: https://playwright.dev
    • Hugging Face docs: https://huggingface.co/docs
  • The Mastery Blueprint: How to Learn Faster, Remember More, and Decode Any Skill.

    Most people approach learning like they’re trying to fill a bucket with a hole in the bottom. They spend hours highlighting textbooks, re-reading notes, and watching tutorials, only to realize two days later that the information has evaporated.

    This isn’t a “memory problem” – it’s a system problem.

    To learn anything at lightning speed, you have to stop acting like a consumer and start acting like a producer. Real learning doesn’t happen when you put information into your brain; it happens when you try to get it out. This guide is designed to move you from passive observation to aggressive mastery by leveraging the way your biology actually functions.

    The Illusion of Competence

    The biggest trap for beginners is the Illusion of Competence. When you read a chapter twice, the text becomes familiar. Your brain recognizes the words and whispers, “I know this.”

    Spoiler alert: It doesn’t.

    Recognition is not the same as retrieval.

    • Recognition: I’ve seen this before. (Passive/Weak)
    • Retrieval: I can explain this from scratch. (Active/Strong)

    To bypass this trap, we use Metacognition – the art of thinking about your own thinking. Before you dive into the “what,” you must master the “how.”

    Passive vs. Active: The Performance Gap

    FeatureThe Passive Trap (Slow)The Active Edge (Fast)
    Primary ActivityRe-reading and HighlightingSelf-Testing and Explaining
    Effort LevelLow (Feels easy, yields little)High (Feels hard, yields mastery)
    Neural ImpactWeak pathways; easily forgottenDeep “ruts” in the brain; long-term
    FeedbackDelayed (Realized during the test)Instant (Realized during the practice)

    By the end of this guide, you won’t just be “studying” harder – you’ll be out-thinking the learning process itself.

    Let’s rebuild your brain’s operating system.

    Phase 1: The Pre-Game – Priming Your Brain for Velocity

    Most learners treat a new subject like a dense forest they have to hack through with a dull machete. They dive into page one, word by word, hoping that if they struggle long enough, they’ll eventually see the light.

    Senior learners do the opposite. They perform Intellectual Reconnaissance.

    Before you commit a single fact to memory, you must use Metacognition – the process of “thinking about your thinking.”

    Phase 1 is about building a mental map so your brain knows exactly where to store new information when it arrives.

    1. The 5-Minute Scan (Priming)

    Priming is the act of exposing your brain to the “skeleton” of a topic before you look at the “flesh.” When you scan headings, bolded terms, and diagrams, you are creating neural hooks. Without these hooks, new information has nothing to hang on to and simply falls out of your memory.

    How to Prime?

    • Flip the Pages: Don’t read. Just look. Spend 30 seconds on each page of a chapter.
    • Focus on Visuals: Study the charts, captions, and infographics. These are often the “Summary” of the most important data.
    • The Chapter Summary: Read the conclusion first. If you know where the story ends, the journey there makes much more sense.

    2. The Inquiry Phase: Curiosity as a Catalyst

    Your brain is a filter designed to ignore boring information. To “unlock” the filter, you have to convince your brain that the information is a solution to a problem.

    Before you start, ask yourself three questions:

    1. What is the ‘Big Idea’ here? (The 30,000-foot view)
    2. What do I already know that is similar to this? (Connecting to existing knowledge)
    3. What is the one question I want this section to answer?

    3. Defining the “Finish Line”

    “Learning Python” or “Understanding History” are too vague. Vague goals lead to vague results. You need to define what Mastery looks like for this specific session.

    Instead of…Try this (The Finish Line)
    I want to study Economics.I want to be able to explain the Law of Supply and Demand to a friend.
    I’m going to practice guitar.I will play the C-Major scale at 100 BPM without a mistake.
    I need to read this report.I will identify the three biggest risks mentioned in this executive summary.

    The brain is a heat-seeking missile for answers. If you don’t give it a question to chase, it will go to sleep. Priming provides the target; Inquiry provides the fuel.

    Phase 1 Checklist:

    • Scan: Have I looked at every heading and image in this section?
    • Hook: Have I found one thing I already know that relates to this?
    • Target: Have I written down exactly what I want to be able to do once I’m finished?

    By spending just 10 minutes on Phase 1, you reduce Cognitive Load – the mental strain of trying to figure out “what is going on” – allowing you to focus 100% of your energy on actually absorbing the material.

    Phase 2: Deep Understanding – The Feynman Technique

    Now that you’ve primed your brain and set your target, it’s time to actually digest the information. Most people fail here because they mistake familiarity for mastery. They read a paragraph, it makes sense, and they move on. If you can’t explain it simply, you don’t understand it. 

    In Phase 2, you’ll use the Feynman Technique, named after Nobel physicist Richard Feynman. It is the ultimate “BS detector” for your own brain. It forces you to strip away jargon and get to the core of a concept.

    The Four Steps to Mastery.

    Step 1: Choose Your Target

    Take a blank sheet of paper. Write the name of the concept you’re learning at the top. This is the “mental folder” you are about to fill.

    Step 2: Explain it to a 12-Year-Old 

    Write out an explanation of the concept as if you were teaching it to a child.

    • No Jargon: You cannot use big words or technical terms. If you have to use a technical term, you must explain that term simply first.
    • Simple Language: Use analogies. (e.g., “Electricity is like water flowing through a pipe.”)

    Step 3: Identify the “Gaps”

    This is where the magic happens. While writing your explanation, you will inevitably hit a wall where you think, “Wait, how does that part work again?” These are your Knowledge Gaps. Go back to your source material (the book, the video, the notes) and specifically study only those missing pieces until you can explain them simply.

    Step 4: Review and Refine

    Now, take your fragmented notes and weave them into a clear, cohesive narrative. Read it out loud. If it sounds clunky or confusing, simplify it further. Your goal is a “polished” explanation that makes sense to anyone.

    The Name vs. The Thing

    Feynman famously noted that you can know the name of a bird in every language in the world, but you will still know absolutely nothing about the bird itself.

    Knowing the Name (Surface)Knowing the Thing (Deep)
    That is the Law of Inertia.Objects keep doing what they’re doing unless something pushes them.
    It’s a Photosynthetic process.Plants turn sunlight into food using a chemical factory in their leaves.
    The ROI is 15%.For every dollar we spent, we made fifteen cents in profit.

    Why This Works (The “Hard” Truth)

    This technique is exhausting. It requires significantly more effort than just reading. But that cognitive strain is the sound of your brain building new synapses. By forcing yourself to simplify, you are building a Mental Model that will stay with you forever, rather than a string of words you’ll forget by Tuesday.

    Note: Knowledge Gaps are not failures; they are GPS coordinates for your next five minutes of study. Don’t fear the ‘I don’t know’ – chase it.”

    Phase 2 Practice

    Before moving to Phase 3, take the one thing you’ve spent the most time “learning” this week and try to explain it in three sentences to someone who has never heard of it. If you stumble, you know exactly what to study next.

    Phase 3: Managing the Load – Chunking & Interleaving

    Even the most brilliant brain has a “memory ceiling.” If you try to jam too much information into your head at once, your Cognitive Load redlines, and your brain simply stops recording. This is why you can read a page five times and still not “see” the words.

    Phase 3 is about organization and strategy. We are going to take that raw understanding from Phase 2 and organize it so your brain can handle it without crashing.

    1. Chunking: The Art of “Meaningful Bites”

    Your working memory can only hold about 4 to 7 “bits” of information at a time. If those bits are random, you’ll fail. If those bits are chunks, you can store massive amounts of data.

    The Phone Number Trick:

    • Try to memorize this: 9175550198. Hard, right?
    • Now try this: 917 – 555 – 0198.

    By grouping the numbers, you turned ten random bits into three meaningful chunks.

    How to Chunk in Learning?

    • Identify Patterns: Don’t memorize 50 individual Spanish words; group them by Food, Travel, or Emotions.
    • The Big Picture First: Always relate a small detail back to the “Big Idea” you found in Phase 1. A detail without a category is just mental noise.

    2. Interleaving: The “Variety” Principle

    Most people use Blocked Practice, they study Topic A for two hours, then Topic B for two hours. Research shows this is actually slower for long-term mastery.

    Interleaving is the practice of mixing related topics or problem types within a single session.

    • Blocked: AAA — BBB — CCC (Feels easy, but creates “robot” learning)
    • Interleaved: ABC — BCA — CAB (Feels harder, but creates “athlete” learning)
    FeatureBlocked Practice (Slow)Interleaved Practice (Fast)
    ExamplePracticing 50 additional problems.Mixing addition, subtraction, and word problems.
    Brain EffortLow (The brain goes on “autopilot”).High (The brain must “choose” the right tool).
    Skill TransferPoor (You struggle in “real world” chaos).Excellent (You learn when to use a skill).

    3. The “3-Chunk” Rule

    When starting a new session, never try to master more than three core concepts at once.

    1. Learn Concept A.
    2. Learn Concept B.
    3. Practice A and B together.
    4. Add Concept C.
    5. Mix A, B, and C.

    By mixing them, you force your brain to distinguish between them. This prevents the “I knew it at home but forgot it during the test” syndrome.

    Confusion is the sweat of the brain. When you interleave topics, it feels messy and frustrating. That frustration is the feeling of your brain actually working to build a permanent structure.

    If it feels too easy, you probably aren’t learning anything.

    Phase 3 Checklist:

    • Break it down: Have I grouped individual facts into 3-5 major categories?
    • Mix it up: Am I switching between different types of problems instead of doing the same one repeatedly?
    • Limit the load: Am I focusing on a maximum of 3 “Big Ideas” in this session?

    We’ve understood it (Phase 2) and organized it (Phase 3). Now, how do we make sure it stays in your head forever?

    Phase 4: Permanent Memory – The Science of “Locked-In” Learning

    You’ve understood the material and organized it into chunks. Now comes the most common point of failure: The Forgetting Curve. Research by Hermann Ebbinghaus shows that within 24 hours, the human brain forgets up to 70% of what it just learned unless it is actively challenged to remember.

    Phase 4 is about moving information from your fragile short-term memory into your indestructible long-term “hard drive.” To do this, we use the two most powerful tools in cognitive science: Active Recall and Spaced Repetition.

    1. Active Recall: The “Search and Rescue” Mission

    Most people “review” by re-reading their notes. This is a waste of time. Re-reading is input; remembering is output.

    Active Recall is the act of closing the book and forcing your brain to retrieve the information from scratch. Every time you struggle to remember something, you are physically strengthening the neural pathway to that information.

    How to do it:

    • The “Blank Sheet” Method: After a study session, take a blank piece of paper and write down everything you remember without looking at your notes.
    • Flashcards (The Right Way): Use apps like Anki or Quizlet. Don’t just look at the answer – say it out loud before you flip the card.
    • Practice Tests: Treat every practice question like a real exam. No peeking.

    2. Spaced Repetition: Beating the Forgetting Curve

    The best time to review something is right when you are about to forget it. If you review a fact every day for a week, you’re wasting effort. If you review it at increasing intervals, you “hack” your brain into keeping it forever.

    The Spacing Schedule (General Rule):

    1. 1st Review: 24 hours after learning.
    2. 2nd Review: 3 days later.
    3. 3rd Review: 1 week later.
    4. 4th Review: 1 month later.
    MethodEffortLong-Term Retention
    Cramming (All night before)HighLow (Gone in 48 hours)
    Re-readingLowLow (Illusion of knowledge)
    Spaced RecallModerateHigh (Permanent mastery)

    3. The “Struggle” is the Signal

    Most students quit when they can’t remember a fact. They think, “I’m just not good at this.” Actually, the moment you are struggling to remember is the exact moment your brain is growing. This is called Desirable Difficulty. If it’s easy to remember, you aren’t learning. If you have to “reach” for the answer, the connection becomes permanent.

    Stop trying to keep the info in your head. Try to pull it out. The ‘reach’ is where the magic happens. Think of your brain like a muscle – if the weight is too light, the muscle doesn’t grow. Active Recall is the heavy lifting.

    Phase 4 Checklist:

    • Close the Book: Am I testing myself instead of just reading?
    • The Gap Test: Did I identify the things I couldn’t recall and re-study them?
    • Schedule the Next Hit: Did I set a reminder to review this topic in 3 days?

    We have the understanding, the structure, and the memory. Now, we need speed.

    Phase 5: Strategic Efficiency – The 80/20 Rule (Pareto Principle)

    We’ve reached the final gear. If Phase 2 was about depth and Phase 4 was about retention, Phase 5 is about velocity.

    Most people waste 80% of their time studying things that only contribute to 20% of their actual performance. A senior learner knows how to flip that script. We use the Pareto Principle: the idea that 80% of the results in any endeavor come from just 20% of the effort or input.

    Phase 5 is about identifying the “Minimum Effective Dose” so you can reach competency while others are still reading the introduction.

    1. Deconstruction: Breaking the “Big Skill”

    Before you start, you must realize that every “skill” is actually a bundle of smaller “sub-skills.” For example, you don’t “learn to cook”; you learn to chop, to sauté, to season, and to manage heat.

    How to Deconstruct:

    • List every single component of the skill.
    • Ask: What are the core building blocks that appear most frequently?

    2. Selection: The 20% Filter

    Once you have your list, you apply the 80/20 filter. You are looking for the tools or concepts that provide the most utility in the shortest amount of time.

    Examples of the 20% Rule in Action:

    • Language Learning: You don’t need 10,000 words. The top 1,000 most common words make up roughly 80% of everyday conversation.
    • Coding: You don’t need every library. Master variables, loops, and logic first – they appear in almost every program.
    • Guitar: You don’t need every scale. Learning 4 basic chords (G, C, D, Em) allows you to play thousands of popular songs.
    High-Impact (The 20%)Low-Impact (The 80%)
    Core FundamentalsNiche, edge-case theories
    Commonly used vocabularyAdvanced technical jargon
    Practical application/ProjectsPurely theoretical reading
    High-frequency patternsRare exceptions and “fluff”

    3. The “Minimum Effective Dose” (MED)

    In medicine, the MED is the smallest dose that will produce the desired outcome. Anything more is wasteful. In learning, the MED is the point where you have enough knowledge to actually start doing the thing.

    Stop “preparing” to learn. Once you have the 20%, stop reading and start doing. The fastest learning happens when you encounter a problem while applying the 20% and have to go hunt for the solution.

    The biggest obstacle to fast learning is the desire for perfection. Beginners want to learn everything in order. Experts learn the most important thing first, then ‘fill in the gaps’ through experience. Be okay with being ‘selectively ignorant’ of the fluff.

    Phase 5 Checklist:

    • Deconstruct: Have I listed all the sub-skills involved in this topic?
    • Select: Have I identified the top 3-5 sub-skills that will give me 80% of the results?
    • Execute: Am I spending more time practicing the “core” than reading about the “details”?

    Conclusion: The Feedback Loop

    You now have the complete Mastery Blueprint:

    1. Prime the engine (Phase 1).
    2. Simplify for deep understanding (Phase 2).
    3. Chunk for mental management (Phase 3).
    4. Recall for permanent memory (Phase 4).
    5. Focus on the 20% that matters (Phase 5).

    Learning isn’t a gift; it’s a process. By following these phases, you aren’t just working harder – you are operating a more efficient machine. Now, take one thing you’ve been putting off and apply the “Pre-Game” scan right now.

    The world belongs to those who can learn, unlearn, and relearn at speed. Go get started.